Drone Fire Detection using AWS IoT Greengrass and SageMaker
Table of Contents
Overview
Once upon a time, I decided to learn more about AWS IoT Greengrass by building a small proof-of-concept project. AWS IoT Greengrass caught my attention because it allows you to run AWS Lambda functions, machine learning (ML) models, and custom code on edge devices, such as Raspberry Pi or industrial gateways. These devices can process data locally, even without a constant cloud connection.
This capability is especially useful for a fire detection system that relies on a fleet of drones operating in remote areas with intermittent internet access. Since drones have limited memory and power, I designed the system to either store batched data locally or upload it to the cloud for further processing, depending on connectivity. Video processing is performed by a Lambda function, which invokes a SageMaker model for inference.
Use Cases for Drone Fleets
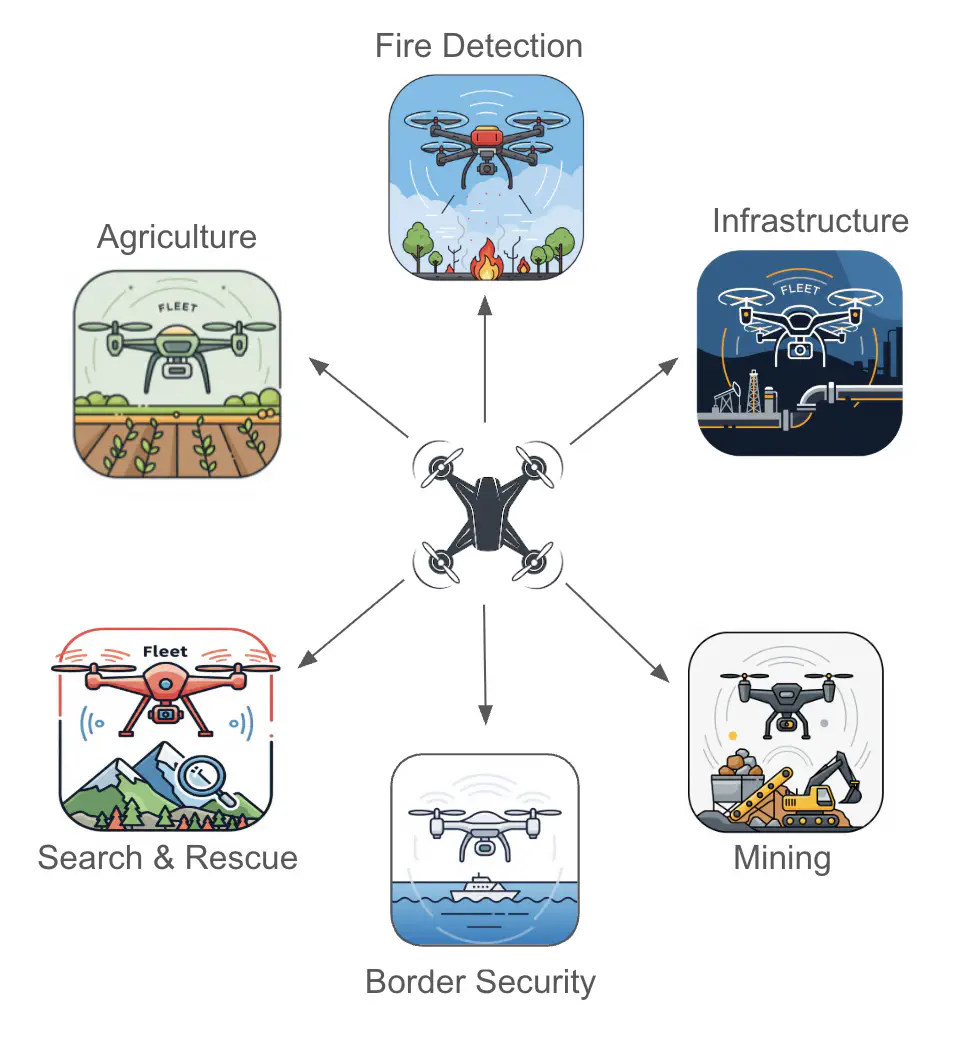
Automatic video analysis is incredibly helpful when a drone fleet is used to monitor large remote areas making video review a hideous task for human operators. Use cases for such fleets include agriculture (crop health analysis, livestock tracking), mining, search and rescue operations, border security, infrastructure monitoring (pipeline and power line inspection) and bush fire detection. In each case, video can be analysed using ML / AI to identify specific features or events.
Coverage Area
The coverage area of a drone camera depends on several factors:
- field of view (FoV)
- altitude
- sensor resolution
- camera tilt.
Typical drone cameras have FoV ranging from 30° to 120°. Fisheye lenses can offer a FoV of 150° - 180°, but they capture hemispherical images with noticeable distortion, which makes them unsuitable where geometric accuracy is important. As you might expect, the higher the drone altitude, the wider the coverage area and the lower resolution. For effective analytics, it is generally necessary to have around 10-20 pixels per object.
Coverage width can be calculated with the formula:
Width = 2 × Altitude × tan(FoV / 2)
For example, at the altitude of 100 meters and a FoV of 90°, the coverage width is 2 * 100 * tan(90/2), about 200 meters.
The flight range depends on the battery capacity, payload and weather. Fixed-wing drones powered by Li-ion or hybrid (gas/electric) batteries can cover 50 - 200 km with 1 – 3 hours of flight time. Some gas-powered drones can even reach 500 km and fly for up to 7 hours. With this capability, a drone fleet can monitor a substantial area.
Comparison of Video Analysis Costs
We already had a well-trained AWS SageMaker model for detecting fires in Australian bush, so using SageMaker for video processing was the obvious choice. However, out of curiosity, I compared the costs of AWS SageMaker to Amazon Recognition and AWS Bedrock for analysis of 5 seconds video (120 frames at 24 fps):
- SageMaker: ~$0.0004
- Rekognition: ~$0.01
- Bedrock: ~$0.30
The cost for SageMaker was calculated based on the assumption that analysing a single frame takes approximately 100 milliseconds, with the endpoint running on an ml.c5.large instance. Asynchronous SageMaker endpoints help reduce costs by eliminating charges during idle time when the endpoint is not in use. This mode is well-suited for processing batched data. Aside from the significantly lower costs, SageMaker also offers more control and higher accuracy, since our model was trained specifically for the fire detection in Australian environments.
Simulation of Raspberry Pi by EC2 Instance
Raspberry Pi boards are often used on drones because they are lightweight, compact and cost-effective. They also provide GPIO pins, camera modules and USB ports for sensors, GPS and communication modules, which is especially usefull for video recording applications.
Since I didn’t have a real drone with a Raspberry Pi and camera, I simulated the setup using an EC2 instance running Ubuntu 20.04. This version was selected because Raspberry Pi currently does not support Python versions higher than 3.9. Using an EC2 instance for Raspberry Pi simulation had a few limitations:
- no physical camera – I used a placeholder video instead.
- no GPS module – I simulated location data with static coordinates.
While this setup was not fully realistic, it was enough to validate the overall architecture.
If you’re looking for a more hands-on guide to setting up Raspberry Pi with AWS IoT Greengrass, I recommend this excellent blog post by Jason Rigby, which covers hardware assembly, SD card preparation, and camera testing.
The EC2 instance was created using a launch template with the following UserData:
Fn::Base64:
  |
    Content-Type: multipart/mixed; boundary="//"
    MIME-Version: 1.0
    --//
    Content-Type: text/x-shellscript; charset="us-ascii"
    MIME-Version: 1.0
    Content-Transfer-Encoding: 7bit
    Content-Disposition: attachment; filename="userdata.txt"

    #!/bin/bash
    apt-get update && apt-get install -y curl unzip
    export HOME=/home/ubuntu
    curl https://awscli.amazonaws.com/awscli-exe-linux-x86_64.zip -o awscliv2.zip
    unzip awscliv2.zip
    ./aws/install
    mkdir /tmp/ssm
    curl https://s3.amazonaws.com/ec2-downloads-windows/SSMAgent/latest/debian_amd64/amazon-  ssm-agent.deb -o /tmp/ssm/amazon-ssm-agent.deb
    dpkg -i /tmp/ssm/amazon-ssm-agent.deb
    snap refresh amazon-ssm-agent
    apt install -y libssl-dev build-essential
    apt update && apt install -y software-properties-common
    add-apt-repository ppa:deadsnakes/ppa -y
    apt update && apt install -y python3.9 python3.9-venv python3.9-dev python3.9-pip openjdk-11-jdk
    --//--
It installs SSM agent, AWS CLI, Python3.9, Java and some other packages. Java is required to run Greengrass core. Python is used as a runtime for a Greengrass component.
Architecture
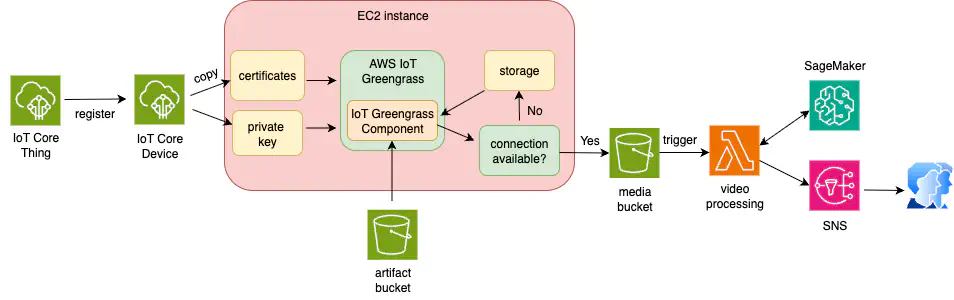
The figure above shows the architecture diagram. An IoT Thing is the logical representation of a physical device in AWS IoT Core. Essentially, it is a record in AWS containing the device’s identity (name, attributes, etc.). An IoT Core Device acts as a security gate between IoT Thing and a physical hardware that runs the AWS IoT Greengrass Core software. This software serves as the runtime for executing local Lambda functions, ML models, or custom code. When an IoT Thing is registered as an IoT Core Device, AWS generates device credentials that must be copied to the physical device (see the next section for more details).
In my setup, an EC2 instance (used to simulate a Raspberry Pi) is registered as the IoT Core device. Since the EC2 instance has neither a video camera nor GPS, a placeholder video file and static GPS coordinates are used.
The IoT Greengrass component is a custom code that runs on the EC2 instance and performs the following actions:
-
Regularly checks for both internet and MQTT connectivity
-
If a connection exists:
- records 5 seconds video using
ffmpeglibrary installed on the EC2 instance - tags the video file with GPS coordinates
- uploads the video file to an S3 bucket
- sends MQTT message to the
drone/statustopic (this step requiesawsiot.greengrasscoreipc.clientv2package)
- If no connection is available, it stores the tagged video file locally until the next connection check.
The artifact bucket contains a ZIP file with the source code and dependencies for the IoT Greengrass component. An S3 upload to the media bucket (see the architecture diagram) triggers a Lambda function, which splits the video into frames and sends them to a SageMaker endpoint. If fire is detected, the Lambda function publishes a message to an SNS topic, notifying all subscribed users.
IoT Thing, Core Device and Security
After creating the IoT Thing, you must manually register it as an IoT Core device. Currently, there is no CloudFormation support for this step, likely because the process involves generating a device certificate along with public and private keys and root CA certificate. These credentials must be downloaded during registration so they can later be copied to the IoT device (in my case, an EC2 instance).
A default policy is created during the registration as well, but it misses some required permissions, so I replaced it by a custom policy. This policy is attached to the certificate device.
Drone:
    Type: AWS::IoT::Thing
    Properties:
        ThingName: !Ref CoreDeviceName

DronePolicy:
    Type: AWS::IoT::Policy
    Properties:
        PolicyName: !Sub ${CoreDeviceName}-policy
        PolicyDocument:
            Version: '2012-10-17'
            Statement:
                - Effect: Allow
                  Action:
                    - iot:Connect
                    - iot:Publish
                    - iot:Subscribe
                    - iot:Receive
                    - greengrass:ResolveComponentCandidates
                  Resource: "*"

                - Effect: Allow
                  Action: iot:AssumeRoleWithCertificate
                  Resource: !Ref GreengrassRoleAliasArn
When an IoT device connects to AWS IoT Core using an X.509 certificate, it needs a way to interact with other AWS services such as S3 bucket for example. The iot:AssumeRoleWithCertificate permission allows the IoT device to assume the Greengrass token exchange IAM role (also known as TES role), which grants temporary credentials. This enables the IoT device to securely access AWS services without embedding IAM access keys.
The TES role has IoT, S3 and logs related permissions. The trust policy for the role:
AssumeRolePolicyDocument:
  Version: '2012-10-17'
  Statement:
    - Effect: Allow
      Principal:
      Service: credentials.iot.amazonaws.com
     Action: sts:AssumeRole
The ARN of the role alias is used as Resource for iot:AssumeRoleWithCertificate permission in the device policy.
GreengrassRoleAlias:
  Type: AWS::IoT::RoleAlias
  Properties:
    RoleAlias: greengrass-execution-role-alias
    RoleArn: !GetAtt GreengrassExecutionRole.Arn
    CredentialDurationSeconds: 7200
The maximum session duration is 43200 seconds.
GreenGrass Core Installation
-
Create a folder for certificates on the EC2 instance (for example,
/greengrass/v2/certificates) and copy the device certificate, root CA certificate and public key there. The paths to the credentials is used in Greengrass configuration file. -
Install awsiotsdk and download greengrass-nucleus installer :
pip3 install awsiotsdk
curl -s https://d2s8p88vqu9w66.cloudfront.net/releases/greengrass-nucleus-latest.zip > greengrass-nucleus-latest.zip
unzip greengrass-nucleus-latest.zip -d GreengrassCore
- Create
config.yamlin./GreengrassCorefolder.
The configuration file must include Nucleus version, IoT endpoints, IoT Thing name, TES role alias and other details. To get IoT endpoints, run the following commands:
aws iot describe-endpoint –endpoint-type iot:Data-ATS
aws iot describe-endpoint –endpoint-type iot:CredentialProvider
Example of config.yaml:
---
system:
    certificateFilePath: "/greengrass/v2/certificates/certificate.pem.crt"
    privateKeyPath: "/greengrass/v2/certificates/private.pem.key"
    rootCaPath: "/greengrass/v2/certificates/AmazonRootCA1.pem"
    rootpath: "/greengrass/v2"
    thingName: <thing name>
services:
  aws.greengrass.Nucleus:
    componentType: "NUCLEUS"
    version: "2.15.0"
    configuration:
        awsRegion: <region>
        iotRoleAlias: <name of TES role alias>
        iotDataEndpoint: <data-endpoint>
        iotCredEndpoint: <credentials-endpoint>
- Run the Greengrass Core installer with
config.yaml
sudo -E java -Droot="/greengrass/v2" -Dlog.store=FILE \
  -jar ./GreengrassCore/lib/Greengrass.jar \
  --init-config ./config.yaml \
  --component-default-user ggc_user:ggc_group \
  --provision true \
  --setup-system-service true \
  --deploy-dev-tools true
If --setup-system-service flag is set to true Greengrass service will be started automatically. To check its status run:
sudo systemctl status greengrass.service
Types of AWS IoT Greengrass Components
There are several types of AWS IoT Greengrass components:
- Generic (custom code)
- Lambda
- Docker (containerised)
- Plugin
- Nucleus (not customisable by users)
Generic components run custom code on the IoT device and can use any runtime. The code size is limited only by the device’s available storage. Dependencies can be bundled as ZIP file or installed by the component during startup.
Lambda components are available only in Greengrass V2. They are invoked once Greengrass Core service starts on the device and can run continuously without timing out by enabling “pinned” mode. To use this mode, the component recipe must include the following configuration:
{
  "lambdaExecutionParameters": {
    "pinned": true,
    "timeoutInSeconds": 0
  }
}
The code size is limited to 250 MB (unzipped). The supported runtimes include Python, Node.js and Java. This component type is not suitable if you need to use large libraries like OpenCV and Numpy.
Plugin components are designed for advanced use cases such as device monitoring, telemetry collection and resource management. They are more complex to implement and were not required for my project. For my use case, I chose the generic component type due to its flexibility, simplicity and ability to use large dependencies.
Deployment of IoT Greengrass Component
This section shows an example of a custom code Greengrass component with an inline recipe that:
- grants permission to publish messages to the drone/status topic using the MQTT proxy
- adds dependency on aws.greengrass.TokenExchangeService, which is required for the component to exchange its device certificate for temporary AWS credentials
- sets environmental variables
- specifies the artifact location and indicates that the artifact must be unzipped on the device
- configures the Python path (PYTHONPATH) to include the dependencies and runs index.py.
If you use a ZIP file as I did, make sure the path to the dependencies and source code file are correct. In my case, unzipping the artifact creates a folder named artifact, which contains index.py file and a python subfolder with dependencies. Therefore, PYTHONPATH is set to
{artifacts:decompressedPath}/artifact/python
The decompressedPath is automatically created by Greengrass when the artifact is extracted.
CustomComponent:
    Type: AWS::GreengrassV2::ComponentVersion
    Properties:
        InlineRecipe: !Sub |
            ---
            RecipeFormatVersion: '2020-01-25'
            ComponentName: com.fire.detection.lambda
            ComponentVersion: 1.0.0
            ComponentDescription: "Video recording component"
            ComponentPublisher: "Amazon"
            ComponentConfiguration:
            DefaultConfiguration:
                accessControl:
                    aws.greengrass.ipc.mqttproxy:
                        "com.fire.detection:PublishToIoTCore":
                            policyDescription: Allows access to publish to drone/status topic.
                            operations:
                                - "aws.greengrass#PublishToIoTCore"
                            resources:
                                - "drone/status"
            ComponentDependencies:
                aws.greengrass.TokenExchangeService:
                    VersionRequirement: '^2.0.0'
                    DependencyType: HARD
            Manifests:
                - Platform:
                    os: linux
                Lifecycle:
                    SetEnv:
                        MEDIA_BUCKET_NAME: ${MediaBucket}
                        CHECK_INTERVAL: 30
                        MQTT_TOPIC_NAME: drone/status
                        MAX_DURATION: 60
                        SIMULATE_VIDEO: "true"
                    run: |
                        PYTHONPATH={artifacts:decompressedPath}/artifact/python python3.9 -u {artifacts:decompressedPath}/artifact/index.py
                Artifacts:
                    - Uri: s3://${ArtifactBucket}/artifact.zip
                      Unarchive: ZIP
The component deployment can be done using CloudFormation template as well.
GreengrassDeployment:
    DependsOn:
        - CustomComponent
    Type: AWS::GreengrassV2::Deployment
    Properties:
        TargetArn: !Sub arn:aws:iot:${AWS::Region}:${AWS::AccountId}:thing/${CoreDeviceName}
        Components:
            com.fire.detection:
                ComponentVersion: "1.0.0"
            aws.greengrass.Cli:
                ComponentVersion: "2.15.0"
        DeploymentName: !Ref GreengrassDeploymentName
The AWS Greengrass CLI component (version 2.15.0) is added for easier device troubleshooting and management.
The logs are stored in /greengrass/v2/logs folder. For example, the logs of com.fire.detection.lambda component show that MQTT connection was succsessful, the test video file was uploaded to the media bucket and a message was published to drone/status topic (created by Greengrass). As this is a proof-of-concept project, I set maximum duration, so the component does not run endlessly. When the maximum duration was reached, a message about the timeout was published to drone/status topic.

Next Steps
- Replace EC2 with real Raspberry Pi and onboard camera
- Add real-time GPS integration
- Add map integration and mission planning features
- Integrate live drone telemetry for improved situational awareness
Conclusion
This side project demonstrates how a combination of AWS services can turn drones into smart scouts for fire detection. It is relatively cheap, extensible, and potentially life-saving. Beyond its practical potential, this project was a valuable deep dive into edge computing and AWS IoT Greengrass.