Building a Slack-Connected Raspberry Pi Doorbell

Table of Contents
Before working from home was the (government-ruled) thing to do, we had many remote workers. There was always a need to cross the barrier between the Internet and real life. We often got remote workers who came visiting or who needed to get attention from the office, but we were usually too busy solving problems (or debating the finer details of coffee) to notice. As we couldn’t wire a doorbell to the building entrance, our alternative solution was to connect the doorbell to the Internet instead.
In this tutorial, we’ll share how to turn a Raspberry Pi into an Internet -connected doorbell you can control by sending messages in Slack. It’ll even be able to announce who has arrived so you won’t accidentally invite vampires into your office. Since this is fairly light on the resource usage of a Raspberry Pi, you can still use it for other things on your network - whether it is streaming music, or casting video to a monitor or television for meetings.
What You Will Need
To follow this tutorial, you will need a few pieces of equipment:
- Raspberry Pi and power adapter
- microSD card and reader
- Speakers and appropriate cables
- Desktop / laptop computer (to flash the SD card and write code on)
You can use any version of the Raspberry Pi Model B, however you will run into fewer roadblocks using a Raspberry Pi 3 B+ or newer, especially if you intend to use your Raspberry Pi for more than just the scope of this tutorial. You will also need a way to connect the Raspberry Pi to the Internet - whether this is via Ethernet cable or Wi-Fi is up to you.
You can also use a Bluetooth speaker if you have a Bluetooth-enabled Pi, but we found this unreliable in practice, especially if you are also using Wi-Fi for the Internet connection. Bluetooth speakers also typically tend to automatically turn off if you don’t send any sound for a while. This means you will also need to write an additional script to keep it alive (by playing silence or something similar).
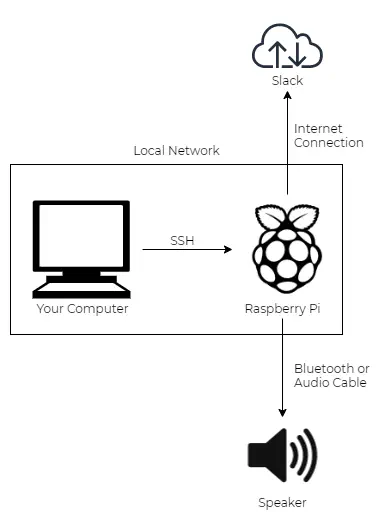
There are many ways to set everything up, but for the most part you will be aiming for something similar to the following diagram:
Preparing Your microSD Card
Our first goal is to install Raspbian onto a microSD card so that our Pi has an operating system for us to use. We can do this one of many ways, but as we have access to another computer to work with, one of the simplest ways is to flash the Raspbian image onto the microSD card with a card reader.
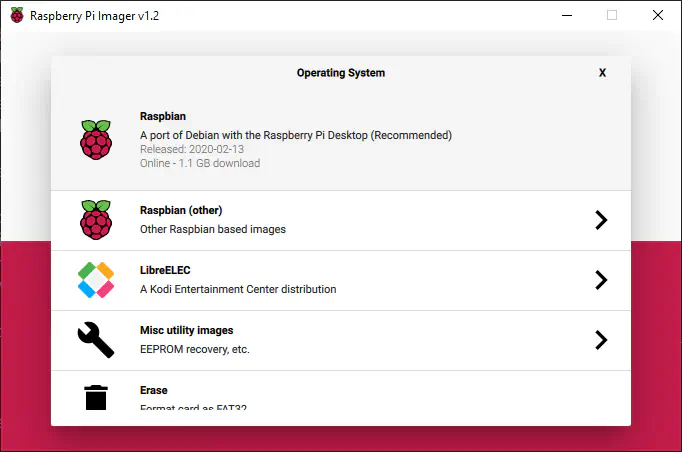
You can download the official Pi Imager tool from the official Raspberry Pi site. Click on Choose OS and pick Raspbian as the operation system you wish to install.
As we’ll be running our Raspberry Pi without a monitor attached, we will need to enable SSH so that we can access the command line remotely from another computer for installing and configuring the software.
The easiest way to enable SSH on Raspbian is to place an empty file named ssh
without any extension onto the boot partition. There are also several other
alternative methods which are detailed
here on the official website.
You may also need to set up wireless networking - this can be done in a similar fashion
by putting the wireless credentials into a wpa_supplicant.conf file on the boot partition as well.
You can find detailed instructions here.
Installing Our Dependencies
We’ll need the sox package installed. We’re using this as it has a convenient gain
parameter which we will need as our text-to-speech engine may not be loud enough.
We can do this by installing it using the package manager as normal:
sudo apt update
sudo apt install sox
Then, we need to install our text-to-speech library - we’re using Pico TTS for this tutorial. Unfortunately, we need to add another source to our apt sources file as it is a non-free library.
Edit the file /etc/apt/sources.list and add the following two lines at the end:
deb http://archive.raspbian.org/raspbian wheezy main contrib non-free rpi
deb-src http://archive.raspbian.org/raspbian wheezy main contrib non-free rpi
You can then do the following to install the required binaries:
sudo apt update
sudo apt install libttspico-utils
That leaves us with only our Python dependencies remaining:
pip install slackclient pyyaml
The Python Code
As we intend to ring our doorbell via Slack, it will need to connect to Slack and listen to commands - one of the easiest ways to accomplish this is to create a bot user within a Slack app. This way, you can invite the bot user to any channel within your Slack workspace where you expect the command for ringing the doorbell to work.
The basic operation of our bot is fairly basic: the bot will listen for a message in any channels it is invited to. If it sees ‘knock knock’, it will ring the doorbell and post a message back in the channel to provide feedback that it has worked.
The basic code for this is very simple - we just need to decorate a function to run on a message event:
import os
import slack
import datetime
import yaml
import subprocess

with open('config.yaml', 'r') as ymlfile:
    cfg = yaml.load(ymlfile, Loader=yaml.FullLoader)

slack_token = cfg['slack_token']


@slack.RTMClient.run_on(event='message')
def message_handler(**payload):
    data = payload['data']

    ring_command = [
        'knock knock',
    ]

    msg_text = data.get('text', []).lower()

    if any([x in msg_text for x in ring_command]):
        channel_id = data['channel']
        user_id = data['user']

        user_name = get_user_name(user_id)
        web_client.chat_postMessage(
            channel=channel_id,
            text=f"<@{user_id}> has rung the doorbell!",
            as_user=True,
        )
        ring_doorbell(user_name)


web_client = slack.WebClient(token=slack_token)
rtm_client = slack.RTMClient(token=slack_token)
rtm_client.start()
Here is the helper function for retrieving a user’s display name or real name - we use this as input into our text-to-speech engine so that our doorbell can announce who has arrived and rung our doorbell!
def get_user_name(user_id):
    user_name = web_client.users_info(user=user_id)['user']['profile']['display_name']

    if user_name == "":
        user_name = web_client.users_info(user=user_id)['user']['profile']['real_name']

    return user_name
To “ring the doorbell”, we make a call to the pico2wave command (which is part of the PicoTTS package we installed above) in order to perform text-to-speech: it will say ‘knock knock’ followed by an announcement of who has arrived.
def ring_doorbell(user_name):
    subprocess.run(["pico2wave", "-l=en-US", "-w=doorbell.wav", f'"knock knock {user_name} has arrived"'])
    subprocess.run(["play", "doorbell.wav", "gain", "-n"])
You may have noticed that the code expects a YAML file containing a Slack Bot API token. You can follow instructions here https://api.slack.com/bot-users in order create an app and get a token. Note that it will need appropriate permissions in order to be able to send and receive messages.
slack_token: SLACK_TOKEN_HERE
Other Notes
You may find that you need the doorbell to be a little louder so it is audible over normal office noise and/or conversation volume.
The first thing to try is to increase the volume in alsamixer.
If you find this insufficient, you may want to also change the play command in the Python
code to increase the gain during playback of the text-to-speech audio file - note that if you
increase this high enough, you will run into clipping issues, which may be undesirable.
And lastly, you can try feeding our audio into an audio amplifer before the speaker.
Once you’re satisfied that your Python script is working, you should create a systemd service
definition and copy it to /etc/systemd/system/. This will ensure that your script will restart
itself if it crashes or if the Raspberry Pi itself is rebooted.
Here’s an example you can modify to match your local environment:
[Unit]
Description=Doorbell_Script
After=multi-user.target

[Service]
Type=simple
ExecStart=/usr/bin/python3 /home/pi/doorbell/main.py
WorkingDirectory=/home/pi/doorbell
Restart=always
User=pi

[Install]
WantedBy=multi-user.target
If you have configured everything correctly, you should be able to now run the service by running the following command:
sudo systemctl start doorbell.service
You can stop the service by running the following command:
sudo systemctl stop doorbell.service
Once you have verified that the service is running correctly, enable it to run on startup by using the following command:
sudo systemctl enable doorbell.service
The Doorbell in Action
Now everyone in the appropriate Slack channels can ring a doorbell without pressing a physical button!